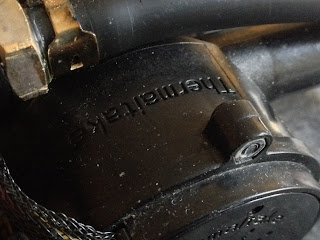
Okay ive had two of these Computer Bay-Watercooling kits, manufactured By Themaltake, for about 8 years now, both still working fine, never had a problem, but they do need a very good clean and maybe a service while im at it.
This post will show you how to get it done very quickly and have your watercooling setup back in action if you have one of these great entry-level watercoolers back from the past !
Difficulty Rating; 2 out of 10 (10 being Super-Difficult Expert-Only)
Tools Needed;
Screwdriver Set (Critical)
PTFE Plumbers Tape (Critical)
Precision Screwdriver set (Optional)
Allen Key Set (Optional)
Pliers (for removing the tubing clips, if needed)
Permanent Marker Pen (i always use a sharpie)
Little Component Bags (to temporarily hold screws) (Critical !!!)
Watercooling Cleaners;
Mayhem's Blitz Kit or
Cillit Bang, Orange Bottle (what i had to hand, not the best thing to use)
i cannot say ENOUGH of how much that using Mayhem's gear for watercooling is such a great time in our lives these days for people with watercooling systems is SO CRITICAL, Mayhem's not only makes great coolant where NO ADDITIVES are needed and they make their own Watercooling Loop Cleaners !
Had i known about Mayhem's, i would have chosen their products in a heartbeat, specially made by their CEO who is a Chemical Engineer !!!
Also, the part-2 of the Blitz Cleaning kit is FANTASTIC - this you can fill into your watercooling loop as per the directions on the bottle, mixed with Distilled or De-ionised water, but i prefer Distilled and in my own opinion only, Distilled is better method, scientifically...
So what i would have done - Before taking the Loop apart, is first drain the Loop, rinse once or twice with Distilled water, then add this Mayhem's Blitz Part-2 Cleaner and leave this running for 12-24 hours and it works its magic cleaning Aluminum radiators, copper, nickle plated waterblocks etc etc then you simply rinse with flowing tap water for about 30 minutes until all the cleaner has been flushed out the system..
Then you can also take it apart as im going to do in this post, and clean it further or replace the tubing..
WARNING - DO NOT USE MAYHEM'S PART-1 on ALUMINUM RADIATORS
Okay so i took apart the Thermaltake bay reservoir units, gave them a good scrub in a bucket of half water and the rest Cillit bang as its the only thing i had on hand...
Here's how to disassemble them with great ease;
Thermaltake 760i/760 PRO
Will start with the 2-Bay Unit first;
i Removed the Fan which was easy enough, had 4 long screws one in each corner, as shows in these photo's
Okay it looks pretty grim inside here, i vacuumed out most of the dust bunnies from on top of the Black Radiator which you will see after removing the fan
This is Underneath the 2-Bay Unit, you want to remove the 4 Screws holding the Radiator in place and the 2 screws holding the pump and another 2 screws holding the Reservoir, remember to label these screw-sets because they will be different types like the screws for the pump are a coarse thread so they can be screwed into the plastic housing of the pump, what i do is use these tiny little component baggies and then write on the bag what the screws are for/from
Same photo below, showing circled screw positions;
Should be 8 screws here, keep these in the little component baggies, so you dont lose them.
Also as this 2-Bay unit i had bought second hand, there were some screws missing lol which i will address a bit later in the post...
Next up is removing the screws on the sides of the unit; circled in light blue, there is also a brace-bar that will be removed from the top of this metal framework enclosure, remembering to keep all screws labelled and into plastic baggies so they don't go missing;
These removed screws will free up the internal workings of the unit and will now be able to be gently removed from the metal framework enclosure and we will be able to better clearly see the parts, Radiator, Pump and Reservoir;
Here's some close-up's;
From here on its a walk in the park ! These 3 components of the watercooling system are simply fitted together into the reservoir, by means of straight metal connectors inserted into the reservoir via O-Rings and it just take a bit of turning each device sideways or from left to right while pulling them out of the reservoir holes
The holes are big, i don't have my digital calipers working yet but i estimate about 16mm diameter, will correct this when i know for sure, but its a simple procedure;


As you can see above, these are like press-fit connectors, and now the radiator is free, next the pump then this leaves the reservoir also removed;


The Pump & Reservoir;
Now each individual part can be cleaned with warm soapy water and the cillit-bang that i had on hand, i read in a forum post somewhere a long time ago that cillit-bang works very well if you dont have the Mayhem's Blitz Cleaning kit, and probably be able to pick it up in supermarkets everywhere, or a very close alternative, i think the anti-limestone agents work well here, mainly because i was using tap water in this loop, a VERY BAD IDEA !
i was the cause of my own Demise here lol, only use Distilled Water in Watercooling loops and forget using anti-freeze, man !!!
Nowadays in this advanced society we have, we are blessed with awesome creations such as Mayhem's inventory of coolants, UV Coolants, Pastel and also Show-Only Metallic Coolants, which are only for display purposes at shows, but the inventory of coolants is very special, formulated with computer watercooling Research & Development, Mayhem's is the only coolant that DOESN'T NEED any additives to be added to it, its simply a PEACE OF MIND fill and forget coolant - AWESOME !!
These coolants from Mayhem's, are the best thing since sliced bread !
I've linked 3 types above for Mayhem's Concentrate-Coolants, where you mix it with Distilled water and then fill your Watercooling Loop with - but WAIT - there''s MORE !
If you're Super Lazy, like me at some times lol, then Mayhem's ALSO do Pre-Mixed Coolant, which as the words say, is pre-mixed already-to-go and simply pour it into your watercooling Loop without having the fuss of mixing anything with measuring jugs etc
But if you're really wanting the best there is for coolants, you gotta check out their ICE DRAGON Coolants which are for the Top-Performance Geeks out there - Yes you've built a great watercooling rig, but it wont be used at its full potential without Top-Grade Coolants too.
No. i don't work for Mayhem's, lol, ive searched for other brands coolants but i just keep coming back to Mayhem's because their coolants are made by rigorous testing and the FACT that the CEO is a CHEMICAL ENGINEER - just blows me away !!!
!~! YOU CANNOT FIND A BETTER COOLANT COMPANY !~!
Now you can either put this unit back together - OR - you can take this a step further and also take apart the Pump to take a look inside and give it a good clean in there too, BUT BE VERY CAREFUL HERE NOT TO GET WATER ONTO THE PUMP's CIRCUITRY ;


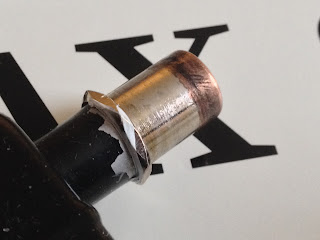
So that side panel came off pretty easily, but as i mentioned that this was a second-hand unit when i bought it - someone had already tried unscrewing the HEX-type screws on the Pump's Enclosure Casing and completely sheered off the HEX allen-key type holes so now i cant take it apart without using specialist and expensive tools that i DON'T HAVE - yet..
There's a screw-remover tool that i saw a youtube video on, it looks great for the task at hand here, this is why its so important to NEVER UN-SCREW ANY screw/bolt without using the CORRECT SCREWDRIVER BIT SO YOU DON'T HAVE TO ALSO GET SPECIALIST TOOLS TO REMOVE THESE COMPLETELY ROUNDED-OFF ALLEN-KEY HEX SCREWS !!!
So now, follow this guide in reverse to put the unit back together, then connect it up to your running water supply, make sure its warm/hot water and run the pump using a 12v power source, for about 30 minutes so that all the cleaning fluids one used, are all flooded out of the system.
Once that is done, its ready to be fitted inside another computer and ready to accept Mayhem's Coolants of your choice.
Really easy job.
Next up will be the bigger 3-bay watercooling unit, once ive taken enough photo's of it, stay tuned, Coming Soon !
if you wish to support me, buying me a coffee would be awesome, finer concentration and longer working hours on designs !
Also whatever funds come in from Patreon, will go towards setting up my PCB Designing Techniques much easier and with getting help to worldwide open source technologies at such LOW PRICES that no one is going to believe it !!
ALL My Designs are also Open-Source, Share Alike, Non Commercial Licensed :)
As long as my work helps someone, truly is the best for of payment needed, im not doing this for monetary drive, These Designs are For EVERYONE when complete, if you have any PCB Designs you want made into Reality, get in contact !
Thanks loads in advance, you're all Awesome !


No comments:
Post a Comment